Andrzej Dragan is a Polish photographer known for his often shocking and provocative style. Since 2003 he has developed his own technique of digital photo processing, which he terms "retouching light". His images are characterised by their high contrast an d muted colours which give his photographs a unique tonal quality. In this tutorial I will show you how to mimic his style using GIMP.
You will find many tutorials around the web detailing how to "draganize" your images. I don't claim my technique to be the best, but it's the one I found works best for me. Different images can respond differently to the same changes, so be sure not just t o copy the exact settings which I use. Play about with the technique to find what works best for you and your chosen image.
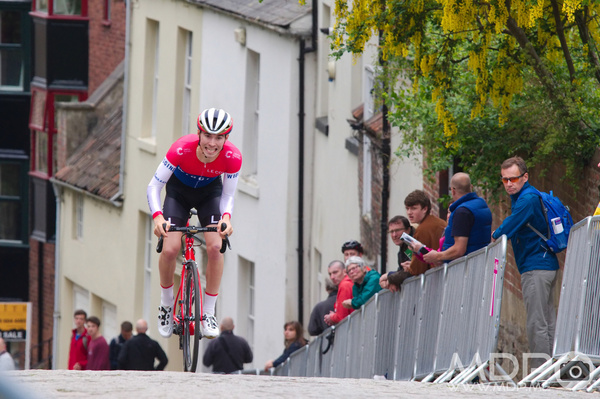
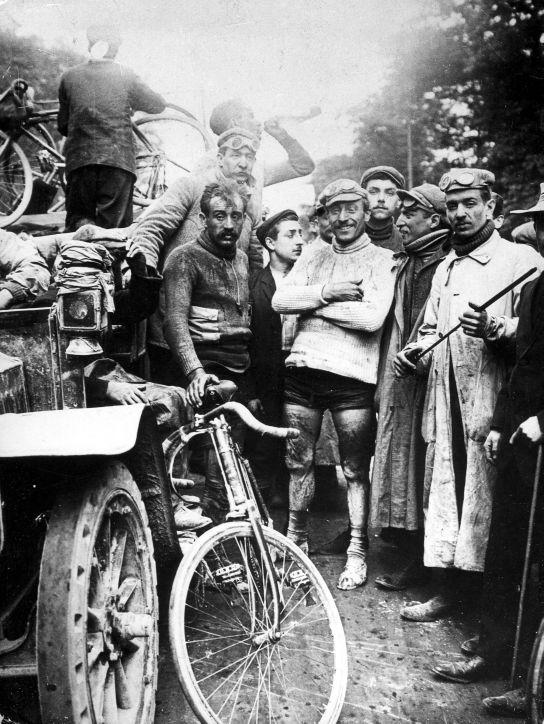
1. The Starting Image
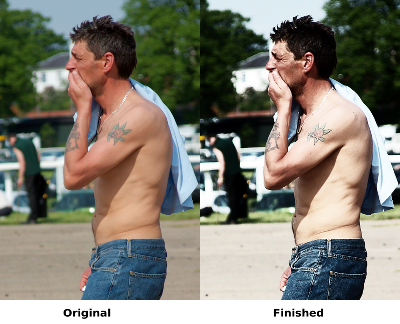
The image I am using is one which I took at Worcester races in 2008.

Click on any of the images in this blog post to see a larger version.
2. Duplicate the Base Layer

Open your image up in GIMP and duplicate the base layer, either by clicking the "Duplicate Layer" button in the Layers dialog or by pressing Shift+Ctrl+D.
3. Increase the Contrast
The first part of the process is to greatly increase the contrast of the duplicated layer. To do so, open up the Levels dialog.
i) Levels
Open the Levels dialog - right click the image and choose Colours->Levels
 You'll need to push the white point arrow (right hand side) quite far to the left and the black point (left hand arrow) a little to the right. What you are aiming for is to greatly exagerate the shadows to bring out the texture of the image.
ii) Sharpen
Next I apply a High-Pass sharpening filter to sharpen the upper layer.

I'll explain different sharpening techniques in another tutorial, but for now you can just use the Eg High-Pass Filter Sharpen plugin from the excellent FX-Foundry script pack. If you don't already have FX-Foundry scripts installed, there are instructions on how to install here. Sharpening the image again helps to exagerate the details. I find quite an aggressive value of between 12 and 14 works best.
iii) Curves
Finally for this stage of the process, apply a contrast curve to this sharpened layer. First you need to create a new layer from the currently visible image by right clicking your contrast layer in the Layers Dialog and selecting "New From Visible", you should also hide the High-Pass filter layer and your original contrast layer. Now open up the "Adjust Colour Curves" dialog from under the "Colours" menu - right click, Colours->Curves.

Place a point at the middle of the curve (initially a straight line) to pin it in place, then select a point half way between this mid-point and the bottom of the line and pull it down. Next pull up the top half of the curve by about the same amount. You should aim for a smooth, vaguely S-shaped curve as in the screenshot above.
4. Apply The Contrast Layer
Next you need to apply the contrast layer we have just created to the original image. First, desaturate the layer - right click, Colours->Desaturate, choose Luminosity as your base.

Next, set your contrast layer's mode to "Overlay" in the Layers dialog as shown below.
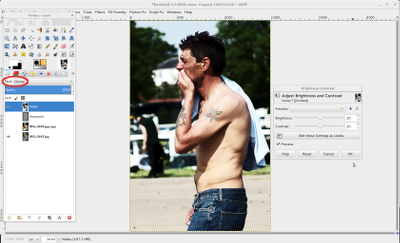
This should have two effects, firstly it will mute the colors of the original image and secondly enhance its contrast. You may want to fine tune the effect by adjusting the contrast and brightness of your desaturated layer - right click, Colours->Brightness-Contrast.
5. Final Tweaks
Once again you should create a new layer from the visible layers as above. This is almost the finished image, but you may want to do some fine tuning.


Use Levels, Curves and the Hue-Saturation dialoges to tweak your image to your taste. Use levels and curves to fine tune the brightness and contrast and use the Hue-Saturation dialogue to get the tonal quality you desire.
6. One Last Sharpen
Once satisfied with the tone of the image, I like to just sharpen it up a touch, I prefer to use the Smart Redux Sharpen tool from FX-Foundry for this:

7. The Finished Image
Below you can see the two images side by side for comparison, followed by the final image.

If this article has helped you feel free to share using the links above.